Whilst remodeling our seating area we also started revamping parts of the back garden to blend in with the seating area.
Sunday 5th September 2021, Scott laid blocks along the path edge, I plan to turn these into planters with grasses to make a border.
We repotted the massive succulent into a pot as it was taking over the whole part of the succulent bed and nothing was able to grow in beside it.
compared to now
There was such a lot of mess for such a long time, there were times when we thought it would never be finished and tidy.
We planned to remove the whirly bird and construct a washing line down the side of the house as I wanted to put plant pots behind the seating area.
Friday 1st October 2021 we tidied up where the line is going to go, removing the weeds and surplus stuff that Scott wouldn't use.
He had to dig a lot of the clay/earth to make it level.
Saturday 2nd October in between showers, Scott took down the whirly bird and butchered it to use to reconstruct a washing line down the side of the house.
Sunday 3rd October saw the washing line finished, all I need now is some dry weather to get the unwashed laundry that is piling up finally washed and hung out to dry 🙏.
In between yet again more showers, we removed the rest of the deck that had been holding the whirly bird up.
We then laid weed mat and moved the planters to hopefully there forever home.
Boy, these guys were a struggle to move, extremely heavy!, I just hope by repotting them that they don't die on me 🙏
Saturday 9th October we got some pebbles for the back garden which we had to carry up from the front in buckets.
We also got some pavers, Scott laid some in between showers.
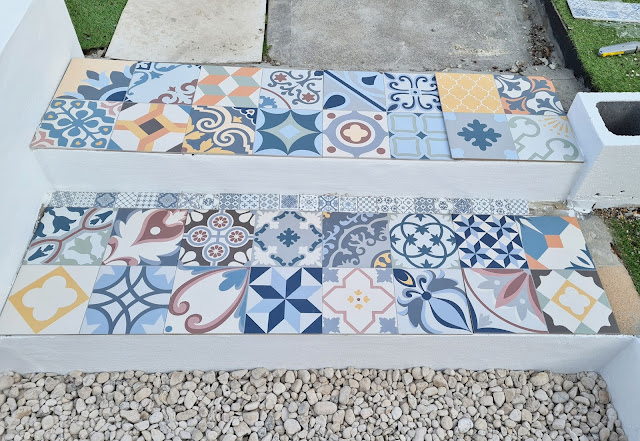
11th October 2021, I spotted this tile in Bunnings and fell in love, I thought it would look fantastic on the garden steps leading from the pavers, they were $69 for a pack of 12, we thought they would be all the same pattern but was pleasantly surprised to find that all 12 tiles had different patterns.
This is how it will look when the tiles are fitted in place on the steps. As there is a gap at the back edge of the tiles we bought a mosaic tile and will cut the squares out to fit in the back edge, they square tiles are the perfect size.
The weekend of the 16th October 2021 we were in a 3-day lockdown from Friday 15th October at 6pm so we couldn't go out to get any supplies for the garden reno.
We had one paver left so Scott bedded it down beside the others.
He removed the hedge from the garden bed as we want to make them all the same.
Oh, and Hamish left a little present in the newly laid wet cement 🐾
We carried what was left of the pebbles up the back and spread them around the fire pit.
We then cleared away the clutter from the other side of the garden so it will be ready when we get the chance to start on that side.
I got these lovely wall frames from Sylvia as she was throwing them out, I took the plants she had in them and planted them in the garden, as the glass pots didn't have any holes I got Scott to drill holes in them.
I cleaned them up ready to be put on the wall.
This is where we plan to put them, on the end panel of the seating.
We then moved the furniture from this area so we could paint the fence.
I planted some succulents in the pots.
We also repainted the lamp post black as it had faded over time.
Stay tuned for part two!


Whether you’re a seasoned gardener or a DIY landscaping enthusiast, investing in high-quality Weed Mat can significantly enhance the health and appearance of your outdoor spaces.
ReplyDelete